

In this quick guide, I’m going to explain how to finish your stripped AR-15 lower receiver…
I’m assuming that you’re a complete beginner and don’t know anything about it.
This is what you need to do to have a fully functional AR-15 if you’ve finished an 80% lower receiver.
The good news is that it’s not that hard…
In fact, as you’ll see below, if you can watch a YouTube video, you can build your AR-15 lower receiver.
It doesn’t require that many parts. And you don’t need that many tools either.
Let’s get started!
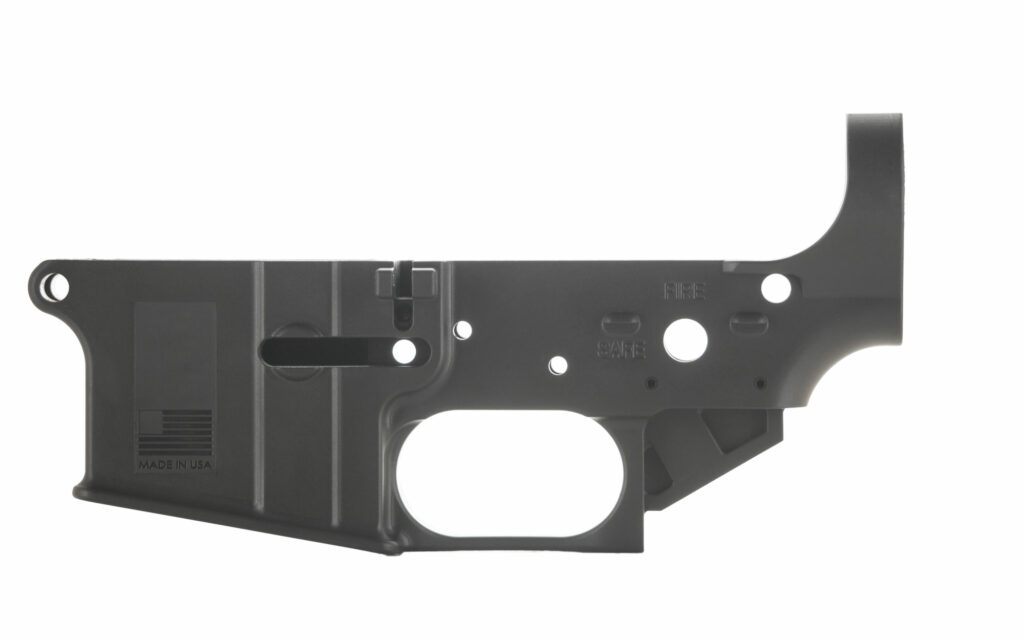
What Is a Stripped AR-15 Receiver?
A stripped lower receiver, is simply an AR-15 lower receiver that is ready to accept a lower parts kit (made up of things like the trigger, the hammer, etc), but no parts have been installed yet.
There are two primary ways to acquire a stripped AR-15 receiver…
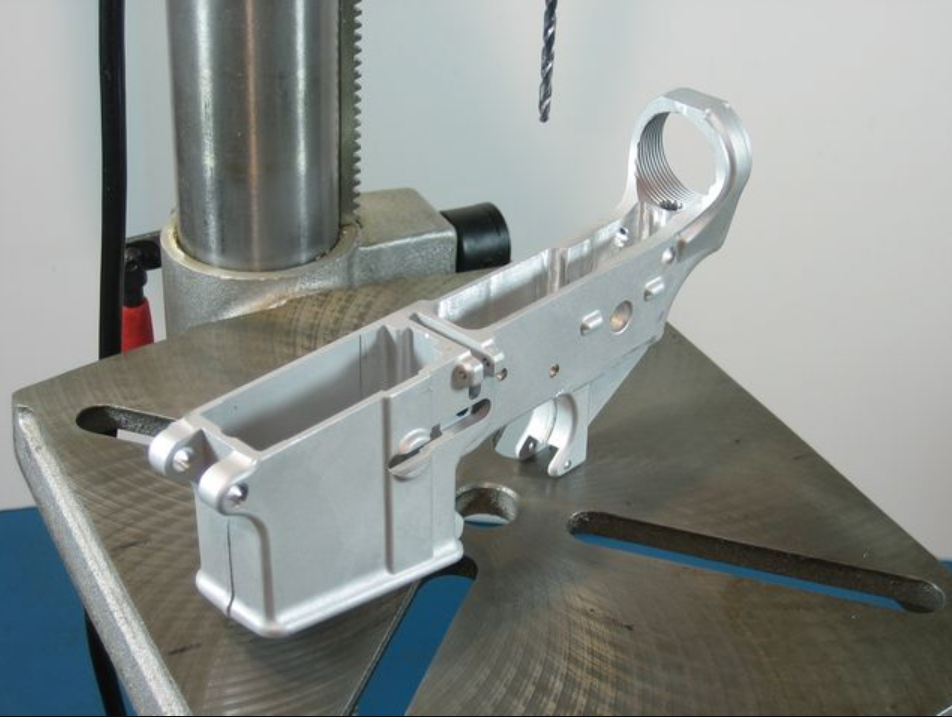
The first way, is if you have built your AR-15 lower receiver yourself from an 80% lower. You did all the milling and cutting and drilling and now you have a firearm:

And the second way is if you purchased a stripped lower receiver, like the ones you can buy from Brownells or practically any gun shop online and offline (be aware that a stripped AR-15 lower receiver is an actual firearm, so if you order it online, it will require transfer to a local FFL before they can transfer it to you with all the background checks, etc)
AR-15 Lower Receiver Parts And Where To Buy Them
Now that you have possession of your AR-15 lower receiver, you will simply need a “Lower Parts Kit” to finish it.
Let’s take a look at a schematic of what parts are used to finish the AR-15 lower receiver, and then I’ll follow it up with a list below for each individual part:

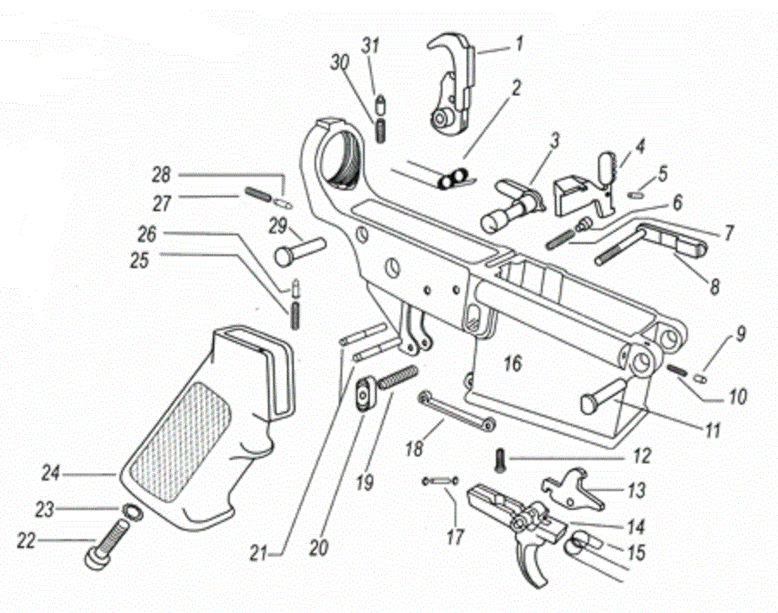
- Hammer
- Hammer Spring
- Safety Selector Lever
- Bolt Catch
- Bolt Catch Roll Pin
- Bolt Catch Plunger
- Bolt Catch Spring
- Magazine Catch
- Pivot Pin Detent
- Pivot Pin Spring
- Pivot Pin
- Disconnector Spring
- Disconnector
- Trigger
- Trigger Spring
- Stripped AR-15 Lower Receiver
- Trigger guard roll pin
- Trigger Guard Assembly
- Magazine Catch Spring
- Magazine Release Button
- Hammer and Trigger Pins
- Pistol Grip Screw
- Pistol Grip Lock Washer
- Pistol Grip
- Safety Detent Spring
- Safety Detent
- Takedown Spring
- Takedown pin detent
- Takedown Pin
- Buffer Retainer Spring
- Buffer Retainer
Now, if you’re already experienced with building AR-15’s then you might choose to “upgrade” some of these parts like the trigger or grip, but for this guide, because it’s aimed at the complete beginner, we will focus on finishing your lower receiver with all mil-spec parts.
So, while that list might seem intimidating, it’s actually easy to get all the parts you need. You simply buy a lower parts kit. PSA is known for making budget-friendly parts:
Prices accurate at time of writing
If you’re looking for the highest quality parts, then Sons of Liberty Gun works (SOLGW) makes a “AR-15 Blaster Guts LPK with Liberty Fighting Trigger”. Better than mil-spec, and a slightly upgraded trigger too:
Prices accurate at time of writing
You will also need:
- a buffer tube assembly and
- a stock of your choice if building a rifle or brace if building a pistol.
You can buy an entire “kit” to complete your lower receiver to save money and time
IMPORTANT NOTE: If you are building an AR-15 that you finished yourself from an 80% lower, you need to decide if you’re going to build your AR-15 as a pistol or a rifle. If it is a pistol, then you can later change it to a rifle by adding a stock. However, you can not legally build it as a rifle first (with a stock) then later decide you want a shorter barrel, and try to turn it into a pistol.
Here is a good, complete kit if you’re building an AR-15 pistol that includes a brace:
Prices accurate at time of writing
And here is a good complete kit if you’re building an AR-15 rifle with a stock:
Prices accurate at time of writing
Gunsmith Tools That Can Be Helpful To Complete Your AR-15 Lower Receiver
There are a few tools that are going to make this easier on yourself…
- A good punch set – if you already have a good set, this is not a necessity, but an AR-15 punch set makes it easy too. A brass set will make it so you don’t scratch up your lower (if you care about that).
- Hex Key Set – You might have these already, if not, good to get. I am starting to like these with the handles. But you need a hex key set.
- Small hammer – you don’t want to bang the crap out of your AR-15 lower, you just want a little extra finesse, the rubber/plastic ends help.
- AR-15 Armorer tool – if you get one of the tools, it’s mostly for upper receiver things, but it makes installing the castle nut super easy.
If you’re starting from scratch, and don’t have any gun-specific tools yet, then you might be better off buying a complete kit like the one below from Real Avid because it includes all the punches you need and the hammer:
I usually end up using my pocket knife, needle nose pliers and a flat head screwdriver at some point too.
You might want some painters tape to cover some parts so you don’t “ruin your finish”. But I really don’t care about scratches on my guns because I shoot them a lot and will later scratch them a lot. But, it’s helpful if you do.
Also, something I’ve never done but seems super smart is to get one of those magnetic dishes so you can not lose all those little parts.
Finally, if you’re super fancy you can use a lower receiver vice block and you’ll then need a vice to use with the vice block, if you don’t have one already.
3 Step-By-Step Videos To Walk You Through The Process
I’ll eventually break down the entire process step-by-step with pictures and descriptions, but because most people enjoy watching video demonstrations, please watch the following step-by-step videos.
From time to time, YouTube has been known to remove gun related videos, so let me know in the comments if these go down.

Good ole Larry Potterfield from MidwayUSA shows you how to do it step-by-step below. Of course, he recommends a lot of tools to make the job easier and you can – of course – get all those tools from his company MidwayUSA:

Finally, in this video, you’ll see how to build and finish your entire AR-15. The first half (chapter 1) shows you how to build your lower receiver:

Conclusion
Congratulations! Once you install your lower parts kit into your stripped receiver, it’s ready to function. Now you’re ready to mate your AR-15 lower receiver to an “upper receiver” and take it to the range.