Do you have a survival bracelet?
If your answer is “no?” Or, “What’s a survival bracelet, Caleb?!?!?” …
Then pay close attention. Because I’m going to show you what it is, why you need one, and best of all — how to make one for pennies on the dollar.
Put simply, a survival cord bracelet will help you to survive. It can be used for everything from stopping blood flow during an emergency to creating a clothesline to air out your supplies.
The cord that is used for making that bracelet is parachute cord, sometimes called the shortened “paracord” or even “550 cord.”
It was originally manufactured to military specification for use in making suspension lines for parachutes. Like anything else made to meet military specifications, it’s a lot more than it seems to be; tougher than any other comparable cord.
The name “550 cord” comes from the fact that a single strand of milspec paracord must be able to support 550 pounds hanging from it. That’s pretty amazing, when you consider that it’s only 5/32 inch (4mm) in diameter. By comparison, a normal three stranded 1/4 inch nylon rope (made of the same material) has a 124 pound rating, much lower than the paracord.
Most of the colorful paracord sold at retail is commercial, as opposed to milspec, as the military specification limits the colors to those normally used for military applications.
Before accepting any paracord as being milspec, you should verify that the manufacturer has a valid Mil-Spec Certification Certificate. Even this may not prove the cord to be milspec, as the same manufacturers often manufacture cord for the military as well as civilian markets.
So that’s step #1: If you’re making a bracelet, you want mil-spec paracord.After all, wouldn’t would make sense to carry the best possible paracord, rather than something that might let you down in a pinch?
So just what is paracord good for anyways?
Well, a lot of really cool things…
You can make replacement straps for a backpack or purse with it.
You can replace your boot laces with it, to ensure you have a few feet more on hand at all times.
But these aren’t the main uses for the paracord.
Besides a good knife and some matches, rope is probably the most useful survival tool around. Its utility comes from its versatility. Some of the many uses for paracord in a survival situation include:
Pitch a tent – If you’ve got a tarp or poncho and some paracord, you can easily make a tent to keep yourself out of the rain.
Hold up your pants – When your belt breaks at the wrong time, you can use paracord to make a belt or suspenders.
Hang a bear bag – Hang your food from a tree branch, high enough to keep any bears that are visiting your campsite from getting into it.
Sleeping in a tree – If you’ve seen Hunger Games, you might remember Katniss tying herself into a tree to sleep at night. I would have tied my body to the trunk of the tree, rather than just tying my legs to a branch, but the idea is the same.
Stop blood flow – In the case of a serious injury to a limb, you may need to stop or slow the flow of blood. A tourniquet made out of paracord will do the trick.
Repairing broken equipment – If a backpack strap breaks or some other piece of equipment falls apart, paracord can be just about as useful as duct tape for emergency repairs.
String a clothes line – Eventually you’ll have to wash your clothes. A clothesline is a much easier way to dry them than throwing them over bushes, where they’ll pick up leaves, bugs and twigs.
Repair torn clothing – Take the paracord apart and use the internal strands to sew back on buttons or repair tears caused by the underbrush.
As dental floss – While you’ve got your paracord torn apart for sewing, you can take the inside yarns apart and use the individual fibers for cleaning between your teeth.
Tie up a captured enemy – If you’re the type that doesn’t want to kill your enemies, but forgot to bring a pair of handcuffs, you can tie them up with short pieces of paracord. Using short pieces is much more secure than long ones, as each additional wrap with a long cord gives more opportunity for slack in the cord.
As a safety rope when climbing – While paracord isn’t climbing rope, it will support your weight. If you aren’t all that sure of your climbing ability, use a couple of runs of paracord to catch you, in case you slip.
Use it for a sling – If you happen to fall while climbing and need to take care of a broken arm, you can use paracord to tie sticks to your arm for a splint, and then make a loop out of paracord for a sling.
Make a backpack – If you find yourself lost without a backpack, you can use paracord to tie up any bundle, putting shoulder straps on it to use as an emergency backpack.
Make a shelter – The hardest part of making a lean-to or other shelter is coming up with some way of tying it together. While you can use grass, it’s a lot harder than it looks. A little paracord will make it much easier to tie those tree branches together.
Start a fire – Make a bow drill for starting a fire.
Make snow shoes – Snow shoes are a loop of wood, with cords strung across it, making a surface that won’t sink into the snow easily. A perfect application for paracord.
Get some food – You can make a sling out of paracord (not a slingshot), use the inner strands for fishing line or make snares to catch small game.
Hang something around your neck – Flashlights, compasses and signal mirrors are easily lost. Hang them around your neck on a loop of paracord to keep them from getting misplaced.
Obviously these 19 suggestions aren’t by any means a complete list
My intent here isn’t to show you everything that you can do with paracord or a paracord survival bracelet, but merely to make you aware of the value of having it in a survival situation.
Now, of course you can buy one … but like we said before they can be kind of pricey.
Now, because we want to be self-reliant, I’m going to show you how to make an awesome mil-spec bracelet yourself… the DIY way… for pennies on the dollar.
Let’s get started…
STEP #1: First, you’ll need to determine the length of the bracelet you want to make. To do so, measure around your arm and then add an inch to an inch and a half, including the length of the buckle.
You’ll need about a foot of paracord for every inch of your bracelet length, less the length of the buckle. So, if you are making a 7-1/2 inch long bracelet, subtract the inch of length for the buckle and multiply by a foot, giving you 6-1/2 feet. Cut it a little long, say at 7 feet, just to be sure you have enough. You can always trim it, but it doesn’t stretch well.
STEP #2: Use the lighter to melt the cut end of the paracord, eliminating any fraying and sealing the end together so that it doesn’t continue to fray.
STEP #3: Fold the piece of paracord in half, so that the ends line up. You will start working from the midpoint. Run the midpoint through one of the buckle loops and pull the cord all the way through the loop that is formed, until the loop is tight up against the buckle. This makes a half-hitch knot.
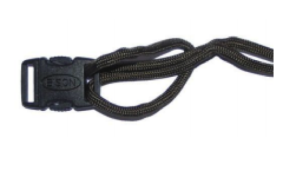 STEP #4: Separate the buckle and run the free ends of the paracord down through the loop on the other end of the buckle, pulling the cord through the loop until you reach the point where the overall length of the bracelet, including the buckles is the desired finished length.
Note: the amount of cord you leave between the two buckles is important as it will determine the overall length of the bracelet.
You will be working from the second end of the buckle. For ease of working, it is helpful to use something to hold this in place. For the photos, I used a couple of small nails to hold it in place on a board. The other part of the buckle is held in place by a clip.
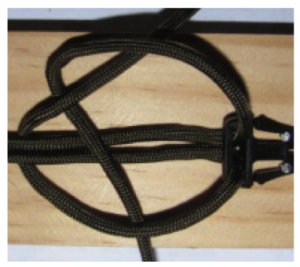
STEP #5: Take one of the loose ends of the cord and pass it under the two strands that are going between the buckles. Then take the other strand and lay it over the two strands as shown in the picture.
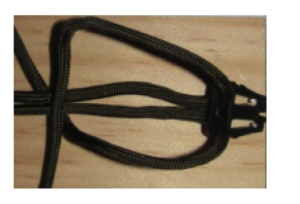 Note: It is important to keep track of which string goes under and which string goes over, as they must consistently do that. So, in the case of the picture, the string that was on the bottom side of the picture went under and the string that was on the top side went over. For the next row of the bracelet, the string that goes over will be starting from the top, not the bottom. It is the same string, it has just changed sides.
STEP #6: Pull the end of the back string through the loop made between the opposite side and the center strands. Then push the front string through the loop made between the opposite side and the center string. Once both ends have been put through the loops, pull tight.
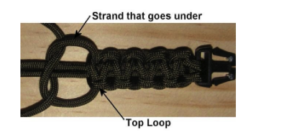
 STEP #7: Continue tying the knots to make the bracelet, alternating sides to keep the pattern consistent. Don’t lose track of which strand is going behind, as that strand always needs to go behind to keep the pattern consistent. After a while, it will look like this:
Note: If you lose track of which strand goes over and which one goes under, you can tell by looking at the knots on the bracelet. There is a loop on the side that goes over the top. The strand on the other side of the bracelet is the one that goes underneath the two strands in the middle.
STEP #8: You will need to continue tying knots until you reach the other end of the bracelet. Don’t worry; once you get the hang of it, it goes very quickly.
STEP #9: Once you reach the buckle at the other end of the bracelet, you are ready to finish it off. To do so, cut the excess cord off about 1/8 inch away from the bracelet. Using the lighter, melt the end of the cord to seal it and prevent it from raveling.
There you have it…
A tool you’ve just made that can do everything from cutting off excessive blood flow… to hanging clothes… to even cutting wire ties in an emergency.



![What Level Holster Should You Be Using? [Video]](/wp-content/uploads/2024/04/Depositphotos_44548439_S-218x150.jpg)
![Case Study: Defensive Gun Use [Video] NSFW](/wp-content/uploads/2025/07/Depositphotos_282075792_S-218x150.jpg)






![Optic Ready vs Milled slides? [Video]](/wp-content/uploads/2024/02/image-3-100x70.png)
![[Checklist] What Gear You Need To Take Pistol, Rifle & Shotgun Training Courses [Video]](/wp-content/uploads/2023/07/Depositphotos_275087632_L-100x70.jpg)
![What is in Carter’s 2023 EDC? [Video]](/wp-content/uploads/2023/07/Depositphotos_146856137_L-100x70.jpg)
